Half Tuck Handstand
Contents
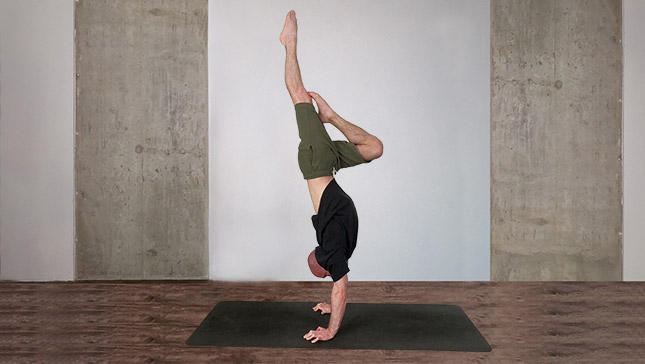
The Half Tuck Handstand is a captivating variation of the traditional handstand that introduces a dynamic and aesthetically pleasing element. It involves bringing one knee toward the chest, creating a tucked position with the legs while the upper body remains inverted in a handstand. This unique combination requires a solid foundation in both handstand technique and core strength.
Mastering the Half Tuck Handstand involves precise technique and a gradual progression. Here’s a step-by-step guide to help you achieve this skill:
Pose Detail
- Advanced: Handstands
Step-by-Step Instructions
Benefits and Contraindications
Core Strength Enhancement
Balance and Proprioception
Control and Body Awareness
Preparation for Advanced Variations
Functional Strength
Wrist Issues
Shoulder Instability
Hip or Lower Back Injuries
Inexperience
Guidelines for Safe Practice
- Focus on engaging your core muscles throughout the movement to maintain stability.
Practicing against a wall or with a spotter can provide safety and confidence. - Start with a partial tuck before progressing to a full Half Tuck Handstand.
- Warm up your wrists and shoulders thoroughly before attempting the skill.
- Consider using yoga blocks under your hands to reduce the distance between the floor and your hands, making the tucked position more accessible and less straining.
Frequently Asked Questions
Tucking one leg in a half tuck handstand serves multiple purposes that contribute to both the aesthetics and the mechanics of the skill. Here are the main reasons for tucking one leg in a half tuck handstand:
- Aesthetic Appeal: The tuck position adds a visually appealing element to the traditional handstand. By bringing one knee toward the chest and tucking it, you create a dynamic and elegant shape that showcases your control over your body while in an inverted position.
- Balance and Control: Tucking one leg in the half tuck handstand can help you find and maintain balance. The tucked leg acts as a counterbalance to the weight of the extended leg, allowing for subtle adjustments in balance by slightly shifting the tucked leg.
- Core Engagement: Tucking one leg engages the muscles of the core even more intensely than in a regular handstand. This added core engagement helps stabilize the body and maintain control over the balance.
- Progression and Challenge: The half tuck handstand serves as a progression from the standard handstand. By adding the element of tucking, you increase the complexity of the skill, challenging your balance, body awareness, and strength in different ways.
- Transition Variations: The half tuck position can also be used as a transitional element in gymnastics and other bodyweight disciplines. It can be incorporated into sequences, routines, and combinations to create visually appealing and dynamic movement patterns.
- Strengthening: The act of tucking one leg while in a handstand involves muscle engagement in both the lower body and core. This can lead to increased strength in the hip flexors, quadriceps, and core muscles over time.
- Skill Diversity: Incorporating variations like the half tuck handstand adds diversity to your skill set. It allows you to explore different shapes and movement possibilities within the realm of hand balancing.
A half tuck handstand engages a variety of muscles throughout your body to maintain balance, control, and the tucked position while inverted. Some of the key muscle groups involved include:
- Core Muscles: The muscles of your core, including the rectus abdominis, obliques, and transverse abdominis, play a crucial role in maintaining a stable body position and preventing excessive arching of the lower back.
- Shoulder Muscles: The muscles in your shoulders, including the deltoids and rotator cuff muscles, work to stabilize your upper body and support your weight on your hands. They also play a role in adjusting your balance as needed.
- Back Muscles: The muscles of the upper and lower back, such as the trapezius, rhomboids, and erector spinae, help you maintain an aligned and balanced posture during the handstand.
- Arm Muscles: The muscles in your arms, particularly the triceps and forearm muscles, provide the strength necessary to support your body weight on your hands.
- Hip Flexors: The hip flexor muscles are engaged as you bring the tucked leg toward your chest. These muscles help create the tucked position.
- Quadriceps: The muscles in the front of your thighs (quadriceps) are activated as you flex the knee of the tucked leg.
- Adductors: The adductor muscles of the inner thighs are engaged to maintain the tuck position by pulling the thigh toward the chest.
- Glutes: The gluteal muscles contribute to maintaining hip stability and overall balance.
- Hamstrings: While not as heavily engaged in the tuck position, the hamstrings play a role in maintaining the alignment of the hips and knees.
- Stabilizing Muscles: Various smaller stabilizing muscles throughout your body also come into play to fine-tune your balance and control in the half tuck handstand position.
Yes, the half tuck handstand can be adapted for individuals with wrist issues by modifying the hand placement and focusing on wrist-friendly variations. Wrist issues can be a significant challenge for practicing handstands, but with proper adjustments and caution, you can still work on the half tuck handstand while minimizing stress on the wrists. Here are some adaptations and tips:
- Forearm Variation: Instead of placing your hands flat on the ground, you can perform the half tuck handstand with your forearms resting on yoga blocks or parallettes. This modification reduces the angle of the wrists and decreases the pressure on them.
- Fingers and Knuckles: Instead of relying solely on the palms of your hands, distribute the weight between your palms, fingers, and knuckles. This can help alleviate some pressure from the wrists.
- Wrist Warm-Up: Prior to attempting the half tuck handstand, perform a thorough wrist warm-up to increase blood flow and flexibility. Gentle wrist circles, flexion and extension exercises, and stretching can help prepare your wrists.
- Wrist Supports: Wrist wraps or braces designed for athletic support can provide added stability and compression to the wrists, reducing discomfort during practice.
- Use Soft Surfaces: If possible, practice the half tuck handstand on a soft surface like a mat or padded floor. This can help cushion the impact on the wrists if there’s a loss of balance.
- Limited Practice Time: Limit the duration of your half tuck handstand practice to avoid overloading your wrists. Gradually increase the time as your wrists become stronger and more accustomed to the movement.
- Alternate Training: While working on the half tuck handstand, also incorporate wrist-friendly exercises that focus on wrist mobility and strengthening. This can help improve the overall health of your wrists over time.
- Consult a Professional: If you have persistent wrist issues, it’s advisable to consult a healthcare professional or physical therapist. They can provide personalized guidance and exercises to address your specific wrist concerns.
Remember that safety and well-being are paramount. If any movement causes pain or discomfort in your wrists, stop immediately and consult a professional. Gradually incorporating these adaptations and modifications, along with consistent wrist care, can help you continue practicing the half tuck handstand while accommodating your wrist issues.
Yes, you can incorporate the half tuck handstand into your yoga practice, but it’s important to approach it with mindfulness and caution. The half tuck handstand adds a dynamic element to your yoga practice and can offer unique benefits, but it’s essential to prioritize safety, proper technique, and gradual progression.
Remember that yoga is about cultivating mindfulness, self-awareness, and self-care. If the half tuck handstand aligns with your goals and practice, approach it with patience and respect for your body’s capabilities. As you gradually incorporate this skill, you’ll not only add a playful element to your practice but also challenge yourself in new and enriching ways.
Practicing the half tuck handstand safely and without straining your lower back requires proper technique, mindful engagement of core muscles, and a gradual approach. Here are some tips to help you practice the half tuck handstand while minimizing the risk of straining your lower back:
- Engage your core muscles from the moment you kick up into the handstand. Actively draw your belly button toward your spine to maintain stability and prevent excessive arching of the lower back.
- Imagine creating a “hollow body” shape by slightly tilting your pelvis posteriorly and tucking your tailbone. This helps to lengthen your lower back and engage your core, reducing the strain on your lumbar region.
- When transitioning into the tuck position, do so gradually and mindfully. Avoid jerky movements that could strain your lower back. Control the movement and maintain core engagement.
- As you find your balance in the half tuck handstand, use your core muscles to adjust and fine-tune your position. Your core will help you maintain a stable alignment and prevent overarching.
- Be cautious not to hyperextend your lower back. Hyperextension can lead to discomfort and strain. Focus on maintaining a neutral spine or a slight posterior pelvic tilt.
- Especially if you’re new to the half tuck handstand, you can start by tucking your knee gently without going too deep. Gradually work on increasing the tuck depth as your core strength and flexibility improve.
- Keep your shoulders actively engaged by pushing through your hands and proactively pressing the ground away. This engagement supports your upper body and promotes a stable foundation.
- When returning to a regular handstand or coming down from the half tuck handstand, ensure controlled movement. Avoid collapsing your legs or arching your lower back as you transition.
- Practicing the half tuck handstand with a wall for support can give you a sense of security as you work on maintaining proper alignment. The wall can also guide you in finding the correct tuck position.
- Start with shorter holds and gradually increase the time you spend in the half tuck handstand as your strength and control improve. Listen to your body and avoid pushing too hard too soon.
- If you have a history of lower back issues or experience discomfort while practicing the half tuck handstand, consider consulting a qualified yoga instructor, physical therapist, or medical professional for personalized guidance.
Top Preparatory Exercises
- Hollow Body Holds: Develop core strength and body awareness.
- Pike Handstand: Practice folding at the hips to mimic the tuck position.
- Wall Tuck Handstand: Work on balance and control in a tucked position.
Top Follow-Up Exercises
- Straddle Handstand: Progress to a straddle position for further challenge.
- Press to Handstand: Enhance your handstand control and strength.
- Handstand Push-Ups: Develop shoulder strength and stability in the handstand position.
