Tuck Handstand
Contents
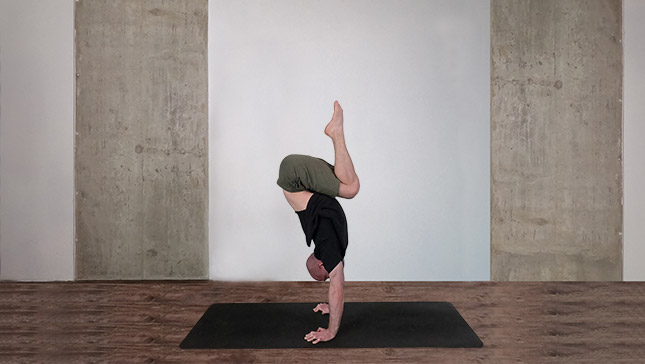
The tuck handstand involves balancing on your hands while your legs are tucked in towards your chest. This pose is an intermediary step that allows practitioners to familiarize themselves with the alignment, core engagement, and balance required for full handstands.
Pose Detail
- Advanced: Handstands
Step-by-Step Instructions
Benefits and Contraindications
Builds Core Strength
Develops Shoulder Stability
Enhances Balance and Coordination
Boosts Confidence
Wrist Injuries or Weakness
Shoulder Issues
Back Problems
Pregnancy
High Blood Pressure
Recent Surgeries or Medical Conditions
Common Challenges and Tips
- Overarching Back: Avoid overarching your lower back; engage your core muscles to maintain a neutral spine.
- Limited Flexibility: If tucking your knees to your chest is challenging, work on hip flexibility with regular stretches.
- Fear of Falling: Use a soft surface or have a spotter nearby to ease any fear of falling.
- Consistent Practice: Progress in the tuck handstand requires consistent practice. Dedicate time to this pose regularly to build strength and confidence.
Integrating Tuck Handstand into Your Practice
- Include the tuck handstand as part of your dynamic warm-up routine.
- Use it as a preparatory pose before attempting full handstands.
- Pair it with other inversions to create a balanced inversion practice.
In Conclusion
The tuck handstand is a bridge between foundational poses and more advanced inversions. It challenges both your physical capabilities and mental resolve, making it an essential pose in the journey of mastering handstands. With patience, practice, and proper alignment, the tuck handstand can propel you towards the exhilarating realm of balance and inversion mastery.
Frequently Asked Questions
Yes, the tuck handstand is often recommended for beginners as it provides a stepping stone toward more advanced handstand variations. It allows practitioners to familiarize themselves with the handstand position while keeping the legs tucked for added stability.
Balancing in a tuck handstand requires core engagement and proper alignment. Regular practice of the tuck position against a wall, along with core-strengthening exercises, will help improve your balance over time.
Fear of falling is common. Begin with practicing against a wall for support, and gradually work on controlled exits to build confidence. Having a spotter or practicing on a soft surface can also help alleviate this fear.
Yes, you can modify the pose by using props like yoga blocks under your hands or practicing against a wall. These modifications allow you to work on alignment and strength before attempting the full pose.
Progression involves gradually extending one leg at a time, working on straddle handstands, pike presses, and eventually achieving a straight handstand. Each step builds upon the foundation of the tuck handstand.
Pregnant individuals should consult a healthcare provider before attempting any inversions, including tuck handstands. It’s generally recommended to avoid intense inversions during pregnancy.
Consistency is key. Start with a few minutes of practice a few times a week, and gradually increase the duration as your strength and comfort level improve.
Top Preparatory Poses
- Downward Facing Dog Pose
- Plank Pose
- Dolphin Pose
- L-Shaped Handstand Against Wall
- Hollow Body Holds
- Leg Tucks on the Ground
- Pike Push-Ups
- Core Work
- Hip Flexor Stretches
- Wrist Mobility and Strengthening
- Wall Supported Tuck Handstand
- Partner Spotters
Top Follow-Up Poses
- Extended Tuck Handstand
- Straddle Handstand
- Press Handstand
- Handstand Pose
- Handstand Walking
- Handstand Push-Ups
- Handstand Scorpion Pose
