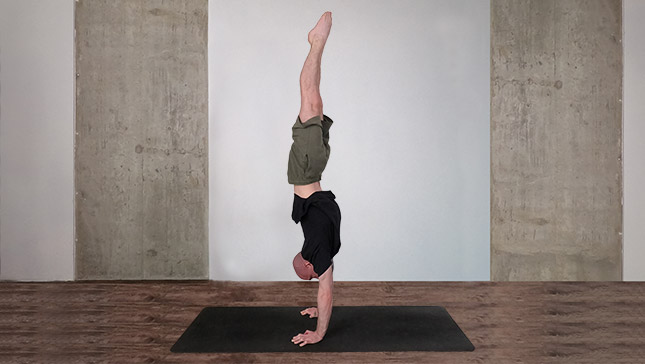
Straight Handstand

Contents
A handstand is more than just a gymnastic feat; it’s a display of strength, balance, and control that embodies grace and athleticism. Within the realm of handstands, the straight handstand stands as a pinnacle of achievement. In this article, we will explore what a straight handstand is, provide step-by-step instructions on how to perform one, discuss its benefits and contraindications, and offer useful tips to help you excel in this remarkable skill.
What is a Straight Handstand?
A straight handstand is a position where the body is aligned vertically upside-down, supported entirely by the hands. In this pose, the body forms a straight line from the wrists through the shoulders, hips, and legs, creating a visually stunning display of balance and poise. Achieving a straight handstand requires a combination of upper body strength, core stability, and refined body awareness.
Pose Detail
- Advanced: Handstands
Step-by-Step Instructions
Benefits and Contraindications
Core Strength
Upper Body Endurance
Balance and Coordination
Confidence and Focus
Wrist or Shoulder Issues
High Blood Pressure
Neck Problems
Photo poses in different angles
Useful Tips for Straight Handstands
- Build Gradually: Progress at your own pace. Master the basics of handstands and gradually work toward a straight handstand.
- Core Engagement: Keep your core muscles engaged throughout the pose to maintain stability and alignment.
- Visualize Success: Imagine yourself in a perfect straight handstand. Visualization can help improve your body awareness and balance.
- Fall Safely: Learning to fall out of a handstand safely is as important as learning to get into one. Practice rolling out of the pose to prevent injuries.
- Patience and Persistence: Perfecting a straight handstand takes time. Be patient with yourself and celebrate small achievements along the way.
Final Thoughts
As you embark on your journey toward mastering the straight handstand, remember that progress comes with consistent practice and patience. Address your concerns and questions, and don’t hesitate to seek guidance from experienced instructors or practitioners. Every step taken brings you closer to achieving the strength, balance, and poise that define the art of the straight handstand.
Frequently Asked Questions
The time it takes to master a straight handstand varies for each individual. It could take weeks to months of regular practice to achieve a solid handstand, and even longer to perfect it.
A straight handstand primarily engages the core muscles, including the abdominals and lower back. It also activates the shoulder muscles, triceps, wrists, and stabilizing muscles throughout the body.
Practicing controlled falls, learning to bail out safely, and using a spotter or practicing against a wall can help ease the fear of falling and build confidence.
It’s generally recommended to give your body time to recover between intense handstand sessions. Aim for 3-5 days of practice per week, allowing your muscles and joints to adapt and strengthen.
If kicking up is challenging, start with wall-assisted practice or use a partner to help you lift your legs. As your strength and confidence grow, you’ll find kicking up becomes more manageable.
Balance improves with practice. Focus on engaging your core, using your fingers to make fine adjustments, and experimenting with weight distribution. Gradually increase the time you spend in the handstand position.
Yes, it’s important to establish a solid foundation in the straight handstand before progressing to variations. The basic skills and body awareness developed in the straight handstand will make learning variations smoother.
Practice shifting your weight away from the wall incrementally, using your fingertips to maintain balance. Over time, you’ll develop the strength and control needed to hold a freestanding handstand.
Variations
- Straddle Handstand
- Pike Handstand
- One-Leg Handstand
- Tuck Handstand
- Hollowback Handstand
- Press Handstand
- Handstand Walking
- Handstand Push-Ups
- Freestanding Handstand
- Handstand Shapes
Top Preparatory Poses
- Downward Facing Dog Pose
- Dolphin Pose
- Plank Pose
- L-Shaped Handstand at the Wall
- Hollow Body Hold
- Dolphin Plank Pose
- Wide Angle Seated Forward Bend Pose
- Extended Puppy Pose
- Single-Leg Balance Exercises
- Wall Walk-Up
Top Follow-Up Poses
- Handstand Against the Wall
- L-Handstand with Leg Lifts
- Straddle Press to Handstand
- Crow Pose
- Feathered Peacock Pose
- Hollowback Progressions
- Warrior Pose III
- Elevated Pike Stretch
- Handstand to Forward Fold Transitions