Mexican Handstand
Contents
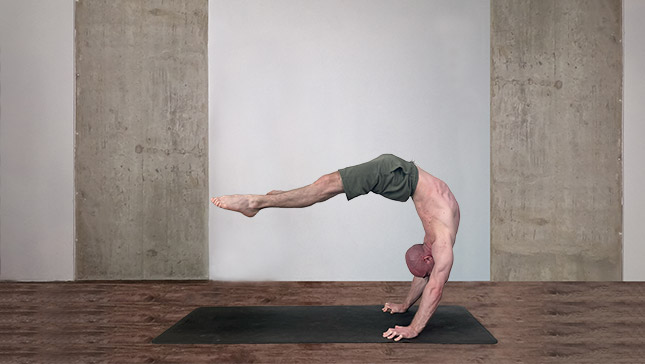
The Mexican Handstand embodies an advanced posture that consistently leaves a remarkable impact. This pose, often referred to as a reverse handstand, involves a profound arching backward motion that engages the entire kinetic chain, with a particular emphasis on the shoulders. The crucial aspect here lies in the comprehensive opening of every facet of the body, transcending the convenience of tackling only the more accessible parts.
Pose Detail
- Advanced: Handstands
Step-by-Step Instructions
Benefits and Contraindications
Shoulder and Wrist Strength
Core Engagement
Flexibility
Body Awareness
Innovation and Creativity
Shoulder, Wrist, Neck or Back Issues
Lack of Shoulder Mobility
Lack of Core Strength
Inexperience with Handstands
Hip Flexor Tightness
High Blood Pressure or Heart Conditions
Pregnancy
Useful Tips
- Master the Basics:
Before attempting a Mexican handstand, make sure you have a solid foundation in traditional handstands. You should be able to hold a handstand against the wall and in the open for a considerable amount of time. - Build Strength:
Mexican handstands require exceptional core, shoulder, and wrist strength. Incorporate exercises like planks, push-ups, shoulder presses, and wrist stretches into your routine to build the necessary strength. - Gradual Progression:
Don’t rush the process. Progression in the Mexican handstand takes time. Gradually decrease the support you rely on, whether it’s a wall or a spotter, as you become more confident. - Patience and Consistency:
Achieving a Mexican handstand is a long-term goal. Stay patient and consistent in your practice. Regular practice sessions, even if they’re short, can make a significant difference over time. - Focus on Form:
Maintain proper form throughout your practice. A straight line from your fingers to your toes is essential for balance and stability. - Safety First:
Always prioritize safety. If you feel unstable or are losing control, it’s okay to come out of the handstand to avoid injuries.
Final Thoughts
Remember, mastering the Mexican handstand takes time, dedication, and patience. Celebrate your small victories along the way and enjoy the learning process. If you have specific concerns or questions, consulting a fitness professional or coach can provide you with personalized guidance.
Frequently Asked Questions
The time it takes to master a Mexican handstand varies from person to person. It depends on your current fitness level, prior experience, and the amount of dedicated practice you put in. It can take months or even years of consistent practice to achieve mastery.
Wrist pain can be common when practicing handstands. To prevent it, ensure you warm up your wrists before training, gradually increase the time you spend on your hands, perform wrist stretches, and listen to your body. If you experience pain, give your wrists adequate rest and consider consulting a professional.
Balance is a common challenge. Practice against a wall, use a partner or spotter, and focus on engaging your core for stability. Small adjustments in finger pressure and body position can also help you find your balance point.
Safety is crucial. Always practice near a wall or with a spotter. Progress gradually and avoid pushing yourself too hard too soon. If you feel unstable, it’s better to come out of the handstand to avoid injury.
Consistent practice is important, but don’t overdo it. Start with a few minutes every day and gradually increase the duration. Allow your muscles and joints to recover to prevent overuse injuries.
Plateaus are normal in any skill development. To overcome them, vary your training routine, incorporate new exercises, work on specific weaknesses, and consider seeking guidance from experienced coaches.
It’s recommended to have a strong foundation in regular handstands before attempting the Mexican handstand. This ensures you have the necessary strength, balance, and understanding of the basic mechanics.
Variations and Progressions
- Mexican Handstand with Straight Legs
- Press to Mexican Handstand
- Mexican Handstand to Mexican Forearm Stand
Top Preparatory Poses
- Downward Facing Dog Pose
- Plank Pose
- Side Plank Pose
- Dolphin Plank Pose
- One Legged Dolphin Pose
- Dolphin Pose
- Complete Boat Pose
- Half Boat Pose
- One Legged Half Boat Pose
- Handstand Pose
- Crescent Low Lunge Pose
- Extended Puppy Pose
- Camel Pose
- One-Legged King Pigeon Pose B
- Bridge Pose
- Wheel Pose
- Wall-Assisted Mexican Handstand
Top Follow-Up Exercises
- Straddle Mexican Handstand
- Pike Mexican Handstand Presses
- Mexican Handstand Straightening the Legs
- Forearm Mexican Stand
