Handstand Pose - Adho Mukha Vrksasana
Contents
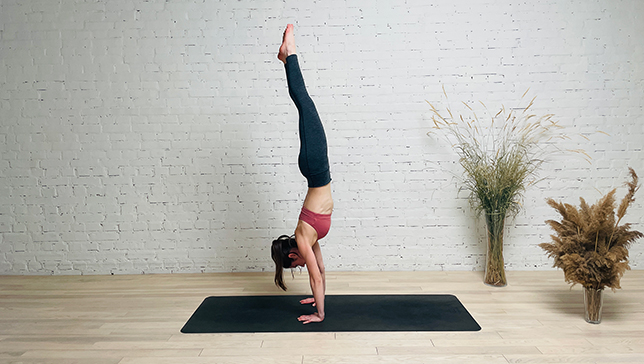
Handstand Pose, Downward Facing Tree Pose or Adho Mukha Vrksasana in Sanskrit forms part of the arm balance sequence which requires the engagement of the physical and mental body, along with the practice of uddhiyana bandha. While the practice of Handstand Pose requires a strong foundation of the arms and shoulders, the ability to lift the hips up, awareness of the breath, core muscle strength, yet, the most important part of this practice is getting out of the fear of falling.
Being a balancing posture, it requires utmost focus and concentration on the gaze or drishti, and breath. The level of confidence is improved, and with practice, students will have better control over the chattering of the mind – thus promoting a sense of calmness.
Since the most challenging part of this advanced pose is the fear of falling, a beginner to Adho Mukha Vrksasana can overcome this by practicing the same with the support of the wall, or even this variation. But the most important thing to keep in mind despite the use of the wall is the alignment of wrists and shoulders, which is very essential. These variations apart from helping build confidence will also help familiarize the body with stacking the hips on top of the shoulders and wrists in one straight line. Though the best way to begin with the practice of Adho Mukha Vrksasana (Handstand Pose) is the repeated practice of Jump Through Pose, which forms part of most Vinyasa Yoga.
Pose Detail
- Difficulty: Advanced
- By Type: Arm Balance Yoga Poses, Balancing Yoga Poses, Strengthening Yoga Poses
- Body Position: Inversion Yoga Poses
Step-by-Step Instructions
Benefits and Contraindications
Improves postural and body awareness
Improves circulation—lymphatic and venous Can help reduce swelling in your ankles and feet
Can boost energy and fight fatigue
Can help build confidence and empowerment
Improves posture and counteracts the effects of sitting and computer work
Mainly strengthens your core, back, chest, arms, shoulders, thighs, buttocks (gluteals)
Caution or avoid if you have osteoporosis, bulging or herniated discs, acute back pain or issues, or any condition that poses a higher risk if you fall Deepen the Pose
Avoid full inversions for heart conditions or unregulated high blood pressure
Avoid or caution when inverting for certain eye conditions (glaucoma, detached retina, diabetic retinopathy, recent cataract surgery, etc.) Ask your optomologist if you are unsure.
Be cautious if you have vertigo or dizziness
Extreme caution or avoid if you are pregnant, particularly if you don’t already have a strong inversion practice
Avoid putting your head below your heart if you have heart burn, indigestion, or acid reflux
Avoid if you have an ear infection
If you are menstruating, you may choose not to do full inversions for comfort and energetic reasons, but there is no known medical reason not to practice
Photo poses in different angles
Tips
Easiest way to come up is by kicking up, however the energy produced in that action is more challenging to control. You can practice this against the wall as it will stop you from falling over or alternatively with a spotter who catches your legs.
Second level would be to bring one knee towards the chest as outlined above.
The third and more advanced level is to use the core and leg strength to lift the legs up without jumping at all. Either by keeping your legs together straight or taking them out wide coming up from Prasarita Padottanasana.
Frequently Asked Questions
Modifications & Variations
- One Handed Tree Pose
- Straddle Split Pose In Handstand
- One Handed Handstand
Top Preparatory Poses
- Plank Pose
- Side Plank Pose
- Four Limbed Staff Pose
- Locust Pose
- Complete Boat Pose
- Half Boat Pose
- Standing Forward Bend Pose
- Standing Split Pose
- Bunny Hops Pose Handstand Preparation
- Half Handstand At Wall
