Customize Consent Preferences

We use cookies to help you navigate efficiently and perform certain functions. You will find detailed information about all cookies under each consent category below.

The cookies that are categorized as "Necessary" are stored on your browser as they are essential for enabling the basic functionalities of the site. ... 

Always Active

Necessary cookies are required to enable the basic features of this site, such as providing secure log-in or adjusting your consent preferences. These cookies do not store any personally identifiable data.

No cookies to display.

Functional cookies help perform certain functionalities like sharing the content of the website on social media platforms, collecting feedback, and other third-party features.

No cookies to display.

Analytical cookies are used to understand how visitors interact with the website. These cookies help provide information on metrics such as the number of visitors, bounce rate, traffic source, etc.

No cookies to display.

Performance cookies are used to understand and analyze the key performance indexes of the website which helps in delivering a better user experience for the visitors.

No cookies to display.

Advertisement cookies are used to provide visitors with customized advertisements based on the pages you visited previously and to analyze the effectiveness of the ad campaigns.

No cookies to display.

Shoulder-Pressing Pose - Bhujapidasana

Shoulder-Pressing Pose - Bhujapidasana - YanvaYoga

Contents

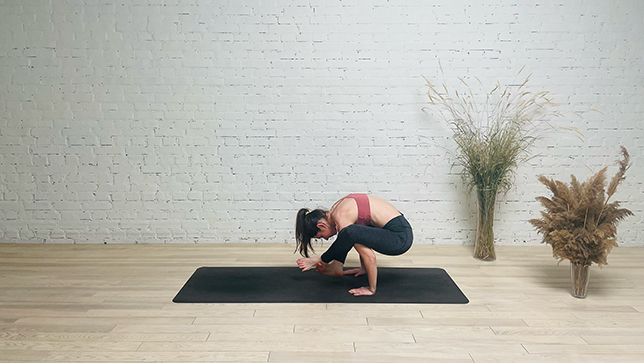
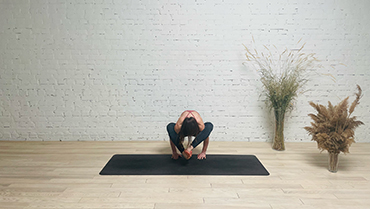
Bhujapidasana, also known as the arm-pressure or Shoulder-Pressing Pose, is an intermediate-to-advanced level move in yoga. The name of the pose comes from three different meanings: Bhuja, which means arm/shoulder, Pida, which means pressure, and Asana, which means pose.

Shoulder-Pressing Pose Basics

  • Targets: Hands, wrists, elbows, arms, shoulders, upper back, hips, and core
  • Equipment Needed: Yoga mat and blocks (optional)

Step-by-Step Instructions

Step 1
Stand with your legs about 2 feet apart. Bend your knees.
Step 2
As you bend down, reach your arms back in between your legs and put your hands behind your heels on the floor. Then stretch your arms around your legs so that your calves press into your upper arms. Press your palms into the mat next to the outsides of your feet. Your fingers should point forward with your thumbs next to your heels.
Step 3
Adjust your thighs to allow them to tuck snugly into the backs of your armpits. You can raise your heels from the mat for a while to help you adjust your thighs into this position. Lean forward and raise your hips. Your thighs should lift to become parallel to the ground.
Step 4
Take a breath. As you exhale, straighten your arms and shift your balance onto your hands. Tighten your core, squeeze your arms with your thighs and slowly lift your feet off of the floor one at a time. Balance on your hands. Lift your feet up a little higher and cross your ankles in the air, hooking the right ankle over the left ankle.
Step 5
Squeeze your knees into your arms to stop your legs from slipping down your arms. Raise your head up to look directly in front of you. Stay here for 30 seconds. Breathe normally. Then on an exhalation, bend your elbows and let your feet come down again.
Step 6
Do the pose again and cross your left ankle over the right ankle in the air this time. Hold the posture for the same duration.

Benefits and Contraindications

Benefits

Stretches the shoulders, triceps, and hip flexors

Tones and stimulates abdominals organs

Strengthens the upper spine musculature

Lengthens the spinal musculature and gluteals

Opens the pelvis and hips

Boosts confidence

Contraindications

Sciatica

Slipped disc

Weak back

Hernia

Heart problems

High blood pressure

Photo poses in different angles

Modifications, Props and Tips

Shoulder-Pressing Pose is very challenging Asana, so don’t challenge yourself until you become perfect in basic Asana. Once you are comfortable with basic level Asana, and then try this with the support of your sitting bones, bolster or block. At first attempt, it seems hard to get into Bhujapidasana but once are ready try doing the following:

  • Keep the abdominals firm and press through the shoulders for support.
  • Squeeze the thighs together and press through the palms to extend the arms. Keep the shoulders engaged.
  • Be cautious of the low spine and hips. Do not strain.
  • Bind the feet together by wrapping one ankle on top of the other.

Frequently Asked Questions


Iana Varshavska
Iana Varshavska
Website administrator

A digital marketer in love with yoga and everything that goes along with it. In 2021, her huge passion for yoga led her to yoga teacher trainings. After successfully completing her studies, Iana received her Yoga Alliance U.S. certification, left the corporate IT world and devoted herself to the development of Yanva. To be able to create the best online yoga space for yoga enthusiasts like her, Iana is constantly learning and improving her skills in various aspects of yoga philosophy, anatomy and biomechanics. Since 2021, she has continued to attend various types of teacher training, including yoga therapy, gives online and offline classes, and conducts local workshops for people who want to learn more about yoga. At the moment, Iana continues to work on her personal practice, improving her hand balancing skills, as well as developing her own training programs.