Reclining Big Toe Pose B - Supta Padangusthasana B

Reclined Big Toe Pose B - YanvaYoga

Contents

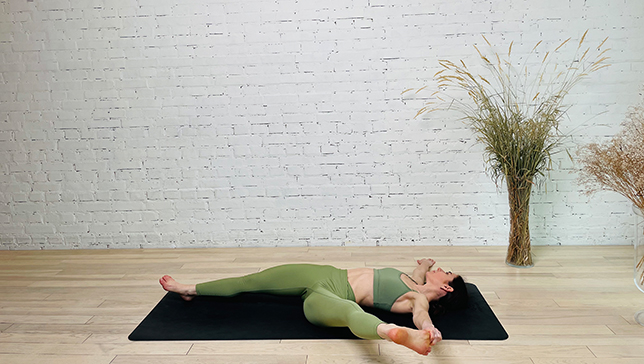
Reclining Big Toe Pose B or Supta Padangusthasana B (soup-TAH pod-ang-goosh-TAHS-anna) is a supine yoga posture that opens the hips and provides a powerful stretch for the adductor muscles, groin and hamstrings. It is an important posture in yoga for opening the body, especially the lower body.
In this posture, the yogi lies on the back with one leg flat on the ground and the other extended to the side of the body. The hand on the same side binds around the big toe and the other arm extends out to the opposite side for stability and an opening across the chest.

Step-by-Step Instructions

Step 1
Begin by lying on your back with your legs bent and both feet flat on the floor. Bring your right knee towards your chest, gently grasping it with both hands. Take a few deep breaths in this position.
Step 2
Next, straighten your left leg. Starting from the center of the back of your left heel, slide the heel away from you. Rotate your left thigh inward, raising the knee towards the ceiling. Extend your toes and push outward through the ball of your foot, creating a long spiral line. Press the sacrum down, creating a slight lumbar curve, while simultaneously pulling in with your hands and flattening your shoulder blades against the floor. Round your chest towards the ceiling, keeping your throat relaxed. Gaze upwards, towards infinity, and breathe easily. Hold this pose for several breaths.
Step 3
Raise your head and try to touch your nose with your knee, while keeping your body relaxed. Make sure to keep your shoulders down and away from your ears. Hold this position for several breaths.
Step 4
Bend your spine, allowing your head to rest on the floor, and return your left leg to the starting position.
Step 5
Straighten your right leg above your head and grasp it with both hands. You can use your left thumb between the big toe and second toe, and your right thumb between the little toe and thumb for a better grip and toe stretch. If you cannot reach your foot, you can use a belt or hold onto your ankle, calf, or thigh.
Step 6
Press your right leg completely straight, engaging your quadriceps muscles, and raise your heel towards the ceiling. Spread your toes and press the ball of your big toe away from you, inwardly turning your leg slightly. Firmly press your sacrum into the floor and gently pull the leg towards you, while flattening your shoulder blades and rounding your chest. Breathe smoothly and wait for the stretch sensations to subside before proceeding. Maintain this position for several breaths.
Step 7
Slide your left leg straight onto the floor, starting from the center of the back of your left heel. Roll your left thigh inward, bringing the knee towards the ceiling. Spread your toes and push outward with the ball of your foot.
Step 8
While keeping the sacrum pressed firmly into the floor, continue to lower your shoulders towards the ground, flattening your shoulder blades. Simultaneously, press both feet away from you as you gently pull the leg tighter. Breathe smoothly and focus on the sensation of stretching. Hold this position for anywhere from thirty seconds to two minutes.
Step 9
Step your right foot to the right, releasing your left hand and grabbing the right leg with only your right hand. Move your left hand to the left as you move your foot to the right, creating a straight line with your arms.
Step 10
Avoid leaning to the right in an attempt to touch the right foot to the floor. Instead, keep the sacrum flat on the floor and only move the foot as far as it can go without bending. Do not allow the right foot to touch the floor until you can maintain a flat sacrum. To prevent tipping, exert more force to pull the left leg inwards, pressing the back of the left thigh against the floor.
Step 11
Lift your chest away from the waist, flatten your shoulder blades against the floor, round your chest, and press both feet away from you. Press the right foot into your right hand, directing the line of energy outward through the foot, not beyond the knee.
Step 12
Breathe comfortably, with emotion. Build the right degree of intensity, not too much, not too little. If this stretch is too intense, bend your legs. Gaze at the sky; Stay here for anywhere from thirty seconds to two minutes.

Benefits and Contraindications

Benefits

Lengthens the hamstring muscles

Stimulates the prostate gland

Improves digestion and reduces constipation

Relieves backache, sciatica, and menstrual discomfort

Lengthens the spine

Contraindications

High blood pressure

Diarrhea

Headache/ migraine

Photo poses in different angles

Modifications and Props for Beginners

  • Using a strap: If you are unable to reach your foot with your hands, you can use a strap to help you get into the pose. Loop the strap around the ball of your foot and hold onto the ends of the strap with your hands.
  • Using a block: If your shoulders or neck are uncomfortable in the pose, you can place a yoga block under your head for support.
  • Using a blanket: If your back is uncomfortable in the pose, you can place a blanket under your hips for extra support.

Useful Tips

  • Keep your hips grounded on the mat throughout the pose. This will help to maintain stability and prevent strain on your lower back.
  • Focus on your breath and try to relax your body as much as possible. This pose is intended to be restorative and calming.
  • If you are experiencing discomfort or pain in the pose, come out of it slowly and gently. Listen to your body and don’t push yourself beyond your limits.
  • Hold the pose for 1-3 minutes on each side, or as long as feels comfortable for you.

Frequently Asked Questions

Is Reclined Big Toe Pose B safe for everyone?

Reclined Big Toe Pose B is generally safe for most people. However, if you have a back injury or pain, you should avoid this pose or practice it with caution. Always listen to your body and work within your own limits.

How long should I hold Reclined Big Toe Pose B?

You can hold Reclined Big Toe Pose B for as long as it feels comfortable for you. Start with holding the pose for 30 seconds to one minute and gradually increase the duration as you become more comfortable with the pose. Remember to breathe deeply and stay relaxed in the pose.

Can I do Reclined Big Toe Pose B if I have a hamstring injury?

If you have a hamstring injury or strain, it is important to consult with your healthcare provider or a qualified yoga instructor before practicing Reclined Big Toe Pose B. This pose may exacerbate your injury, so it is important to modify the pose or avoid it altogether until you have fully healed.

What should I do if I can't reach my big toe in Reclined Big Toe Pose B?

If you cannot reach your big toe in this pose, you can use a strap or towel to loop around the ball of your foot and hold onto the ends of the strap instead. You can also practice with your knee slightly bent, or use a block or bolster under your head for support.

Variations

  • Reclined Big Toe Pose A
  • Reclined Big Toe Pose B With A Strap
  • Reclined Big Toe Pose B With A Block
  • Reclined Big Toe Pose B With Spinal Twist
Best Yoga Straps Reviewed and Rated
The Best Yoga Straps: Your Ultimate Buying Guide
/

You do not compulsorily need anything more than your body, breath, and a room spacious...

best yoga mat for you
The Best Yoga Mats For Your Practice
/

The art of yoga is a special one and those who enjoy practicing on their...

Best Cork Yoga Blocks
The Best Cork Yoga Blocks For Support And Flexibility
/

A yoga block crafted from cork material serves as a supportive prop in yoga practice....

best yoga blankets review
7 Best Yoga Blankets – Extra Grip And Gentle Support
/

The yoga blanket is an accessory every yogi needs. Whether you’re more experienced or just...


Iana Varshavska
Iana Varshavska
Website administrator

A digital marketer in love with yoga and everything that goes along with it. In 2021, her huge passion for yoga led her to yoga teacher trainings. After successfully completing her studies, Iana received her Yoga Alliance U.S. certification, left the corporate IT world and devoted herself to the development of Yanva. To be able to create the best online yoga space for yoga enthusiasts like her, Iana is constantly learning and improving her skills in various aspects of yoga philosophy, anatomy and biomechanics. Since 2021, she has continued to attend various types of teacher training, including yoga therapy, gives online and offline classes, and conducts local workshops for people who want to learn more about yoga. At the moment, Iana continues to work on her personal practice, improving her hand balancing skills, as well as developing her own training programs.