Bridge Pose - Setu Bandha Sarvangasana

Contents
Bridge pose, also known as Setu Bandhasana or Setu Bandha Sarvangasana in Sanskrit (‘setu’ means ‘bridge’, ‘bandha’ means ‘bind’ or ‘lock’, ‘sarvanga’ means ‘all limbs’ or ‘the whole body’, and ‘asana’ means ‘pose’), is a yoga pose that strengthens the legs, hips, and back muscles, as well as opens up the chest and shoulders.
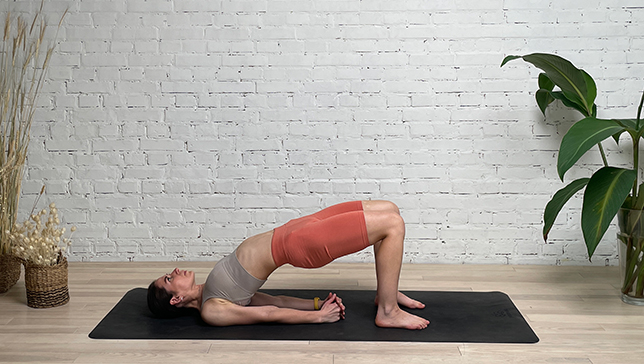
Here in Setu Bandhasana the entire spine is so beautifully curved and away from the floor/mat, which looks like a bridge. This asana is rather multifaceted. It combines the elements of a backbend, inversion, supine neck flexion, and a heart opener. Simultaneously, it brings focus to the lower body, strengthening ankles, thighs, glutes, and hips. Additionally, it stretches and tones the abdominal muscles, which in turn results in a more stable core and improved digestion. Considering the plethora of benefits it provides, it would be a wise choice to include it in your daily practice.
Setu Bandha Sarvangasana is a beginner-level backbending yoga pose. It is considered a base pose as bridge pose variations can be derived from this pose. Bridge Pose helps boost energy in the body and hence can be included in different yoga sequences.
Pose Detail
- Difficulty: Beginners
- By Type: Chest Opening Yoga Poses, Strengthening Yoga Poses
- Body Position: Supine Yoga Poses
- By Benefit: Yoga Poses For Anxiety And Panic Attack, Yoga Poses For Digestion, Yoga Poses For Periods, Yoga Poses For Sleep, Yoga Poses For Stress Relief, Yoga Poses For Weight Loss
Step-by-Step Instructions
Benefits and Contraindications
Stretches the chest, neck, and spine
Stimulates abdominal organs, lungs, and thyroid
Rejuvenates tired legs
Improves digestion
Reduces anxiety, fatigue, backache, headache, and insomnia
Calms the brain and helps alleviate stress and mild depression
Therapeutic for asthma, high blood pressure, osteoporosis, and sinusitis
Helps relieve the symptoms of menopause
Relieves menstrual discomfort when done supported
Neck injury: avoid this pose unless you are practicing under the supervision of an experienced teacher.
Women who are pregnant should avoid this as a lot of pressure is put to the lower abdomen and the internal organs thus making breathing difficult which can be harmful for the fetus.
Weak stomach or intestine
Injured back or a sore back
Knee replacement or if the stage of osteoporosis is severe
Photo poses in different angles


Modifications and Props
Even though Bridge Pose is a beginner-level pose sometimes it can be challenging to perform it due to some health conditions or the practitioner’s level of training. Props will come in handy here. Here are some modifications of this pose with props you can try:
- Block under the sacrum: Place a yoga block under your sacrum (the bony area at the base of the spine) to provide support and lift. This modification can be helpful for those with tight hips or lower back pain. Choose the height of the block according to your comfort level.
- Strap around the thighs: Wrap a yoga strap around your thighs above the knees to keep them parallel and prevent them from splaying outwards. This modification can be helpful for those with a tendency to turn out their thighs or who experience discomfort in their knees.
- Rolled blanket or bolster under the neck: Place a rolled blanket or a bolster under your neck to support the cervical spine and avoid any discomfort in the neck. This modification can be helpful for those with neck pain or discomfort.
- Feet on a wall: Place your feet on a wall with your knees bent to 90 degrees, and then lift your hips up into the bridge pose. This modification can be helpful for those with tight hamstrings or for those who are not able to lift their hips off the ground comfortably.
- One-legged bridge pose: Lift one leg up towards the ceiling, keeping the knee bent. This modification can help to deepen the stretch in the hip flexors and hamstrings of the lifted leg.
Useful Tips
- Take your time working on lifting up into Bridge with control. You might like to practise coming in and out of the pose a few times first before holding the pose for a few breaths.
- Pay close attention to your knees, don’t allow them to fall out wider than your feet as you rise upwards. If you find this happens you can squeeze a yoga block between your thighs as you come up.
Frequently Asked Questions
Yes, beginners can do Bridge Pose, but it is important to start with modifications and gradually work up to the full pose as your strength and flexibility improve.
Bridge Pose works the glutes, hamstrings, back muscles, and core muscles.
You can hold Bridge Pose for 5-10 breaths or longer, depending on your level of comfort and experience.
It is best to consult with a doctor or a prenatal yoga teacher before practicing Bridge Pose or any other yoga pose during pregnancy.
If you feel pain or discomfort in Bridge Pose, come out of the pose and rest. You can also try modifying the pose or seek guidance from a yoga teacher. It is important to listen to your body and avoid pushing beyond your limits.
Yes, Bridge Pose can help improve posture and strengthen the back muscles, which can help alleviate back pain. However, it is important to practice the pose safely and within your limi
Variations
- One-Legged Bridge
- One Legged Bridge Pose Block Under Sacrum
- Bridge Pose Variation Elbows
- Bridge Pose Variation Toes
- Bridge with a yoga wheel
- Wheel Pose
- Bridge Pose Variation with block
- Bridge Pose Block Chair