Customize Consent Preferences

We use cookies to help you navigate efficiently and perform certain functions. You will find detailed information about all cookies under each consent category below.

The cookies that are categorized as "Necessary" are stored on your browser as they are essential for enabling the basic functionalities of the site. ... 

Always Active

Necessary cookies are required to enable the basic features of this site, such as providing secure log-in or adjusting your consent preferences. These cookies do not store any personally identifiable data.

No cookies to display.

Functional cookies help perform certain functionalities like sharing the content of the website on social media platforms, collecting feedback, and other third-party features.

No cookies to display.

Analytical cookies are used to understand how visitors interact with the website. These cookies help provide information on metrics such as the number of visitors, bounce rate, traffic source, etc.

No cookies to display.

Performance cookies are used to understand and analyze the key performance indexes of the website which helps in delivering a better user experience for the visitors.

No cookies to display.

Advertisement cookies are used to provide visitors with customized advertisements based on the pages you visited previously and to analyze the effectiveness of the ad campaigns.

No cookies to display.

Crow Pose - Kakasana

Crow Pose (front) - Iana Varshavska

Contents

Crow Pose, known as Kakasana, and Crane Pose, known as Bakasana, are both versions of the same balancing position. Crow Pose is the easier of the two poses, where you balance closer to your hands. Crane Pose is a more extended version. It’s good to practice and get the hang of Crow Pose first and then to move on to the trickier Crane Pose. For both of these poses, it’s important to practice balance first and to build core strength with poses like Plank Pose and Boat Pose.

Step-by-Step Instructions

Step 1
Start in Tadasana and take your feet out to the edges of the mat. Squat down.
Step 2
Stretch your arms out in front of you and place the hands shoulder distance apart on the floor. Spread your fingers wide to get a firm grip on the floor which will ease control while balancing. The middle fingers are parallel to each other.
Step 3
Activate your core by pulling your belly button in towards your spine and start lifting your seat up so your torso is parallel to the ground. Step your feet together maintaining the knees wide.
Step 4
Slightly bend your elbows, ensure they stay shoulder width apart throughout the pose (so they don’t fall out to the sides) and then there are two options on where to place the knees up into or as close as possible to your armpits.
Step 5
Ensure that your inner thighs are engaged and are hugging into the midline of your body.
Step 6
Start leaning slightly forward, feeling the weight shifting evenly into the four corners of your hands.
Step 7
When you feel the weight is mainly on your hands start lifting up your heels up towards your seat with the big toes together. Alternatively, if you are new to this pose and to get comfortable, just play with shifting your weight into your hands and lifting up just one foot at a time. Your back is slightly rounded and the belly button continues to pull in towards your spine.
Step 8
Find your Drishti slightly in front of you, take a few deep breaths here before you lower your feet back down onto the ground. A more advanced exit of this pose is to press into the hands, keeping the chest elevated so you don’t drop, and jump the feet to the back of the mat into low Chaturanga.

Benefits and Contraindications

Benefits

Strengthens the wrists, arms, shoulders, inner thighs and core muscles.

Mobilizes the upper back and hips.

Mobilizes the upper back and hips.

Contraindications

Avoid this pose if you have any wrists (like carpal tunnel syndrome) or shoulder injuries.

You might want to avoid this pose if you feel discomfort and suffer from sciatica, spondylitis or other back/disc problems as the spine is slightly rounded.

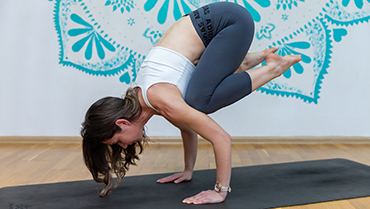
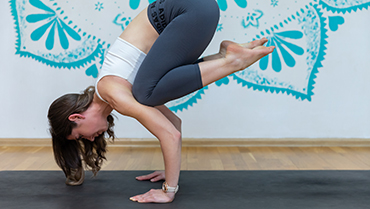
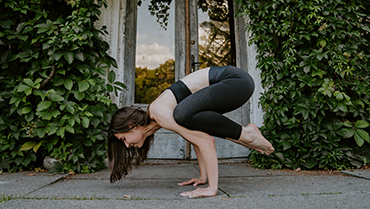
Photo poses in different angles

Modifications, Props & Tips

  • If you feel this pose in your wrists you can, to reduce pressure, roll up a mat and place the palm of the hands on the mat and the fingers on the floor.
  • If elbows fall out to the sides you can tighten a strap around your arms just over your elbows (shoulder distance apart) to keep them in place.
  • Place a pillow under your head to gain confidence shifting your weight forward.

Frequently Asked Questions

Variations

  • Side Crow Pose
  • Flying Crow Pose

Top Follow-Up Poses


Iana Varshavska
Iana Varshavska
Website administrator

A digital marketer in love with yoga and everything that goes along with it. In 2021, her huge passion for yoga led her to yoga teacher trainings. After successfully completing her studies, Iana received her Yoga Alliance U.S. certification, left the corporate IT world and devoted herself to the development of Yanva. To be able to create the best online yoga space for yoga enthusiasts like her, Iana is constantly learning and improving her skills in various aspects of yoga philosophy, anatomy and biomechanics. Since 2021, she has continued to attend various types of teacher training, including yoga therapy, gives online and offline classes, and conducts local workshops for people who want to learn more about yoga. At the moment, Iana continues to work on her personal practice, improving her hand balancing skills, as well as developing her own training programs.