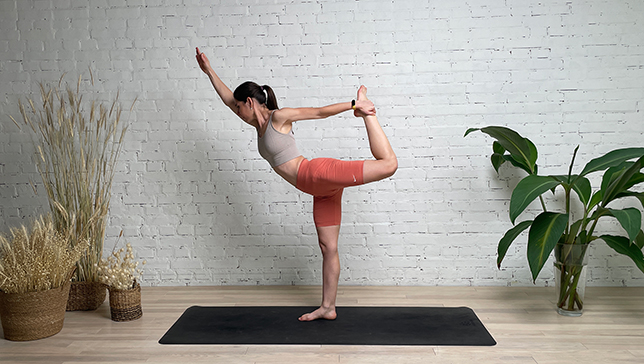
Dancer Pose - Natarajasana

Dancer Pose (front) - Iana Varshavska

Contents

Dancer pose or Natarajasana in Sanskrit,  where ‘Nata’ means ‘dancer’ and ‘Raja’ means ‘Lord or King’. Dancer Pose is also attributed to Lord Shiva who is called Lord of the Dance. This vigorous and beautiful pose is dedicated to Lord Shiva, who is also the fountain and source of Yoga.

This yoga pose is considered as an advance level yoga pose and requires repeated practice to get it perfect and right. The focus is mainly on the twisting of the middle back in order to grab the foot and the strength of the legs and arms to go beyond the natural stretch. Dancer Pose is considered a base pose as dancer pose variations can be derived from this pose. Dancer Pose helps boost energy in the body and hence can be included in flow yoga sequences.

Step-by-Step Instructions

Step 1
Start in Tadasana with the big toes together and heels slightly apart. Arms are alongside the body.
Step 2
Bring the weight into the left foot and bend the right knee in back of you reaching the right heel to the right buttock.
Step 3
Bend the right elbow and hug the elbow to the right side of the body. Forearm extends out and the palm faces towards the sky.
Step 4
Reach the right hand back to grab hold of the inner right ankle or shin. The fingers wrap around the top of the foot and the thumb comes to the inner arch. Keep the knees together and both knees point forward. *Modification: Loop a strap around the right foot if you lack flexibility or to give you more room to play with the pose.
Step 5
Extend the left arm up to the sky, reach through the fingertips and the palm faces the midline of the body. Make sure you are not crunching that left shoulder up to the left ear. Shoulder blades draw down the back.
Step 6
Bring your gaze to a non-moving point on the horizon.
Step 7
Engage the belly by gently lifting the navel in and up towards the spine.
Step 8
Once you find your balance here begin to press the right foot or shin into the right hand and press the right hand into the shin or foot to create some tension. Simultaneously lean your torso gently forward and reach your fingertips towards the sky.
Step 9
Broaden through the collar bones and open up the chest even more.
Step 10
Keep pressing the right foot or shin up and back but make sure the knee does not splay out to the side.
Step 11
Steps 11&12 are for the Advanced Expression of the Pose: If you would like to go deeper, bring the right elbow to point up towards the sky. Drop the right shoulder and hug the right bicep to the right ear. The right forearm should be perpendicular to the head.
Step 12
Then gently bend the left elbow and grab a hold of the right foot. Elbows should be parallel to one another and pressing into the midline of the body. Draw the shoulder blades down the back. Keep shining the heart out and up. Hips stay even and squared. Knees keep pressing towards the midline of the body. You may be able to drop the head back gently and touch the foot to the head.
Step 13
To release King Dancer Pose, slowly let go of the right foot, come to an upright position and gently place the right foot back on the earth. Repeat on the opposite side.

Benefits and Contraindications

Benefits

Improves balance Improves postural awareness

Can boost energy and fight fatigue

Can help build confidence and empowerment

Improve body awareness

Improves posture and counteracts the effects of sitting and computer work

Strengthens your core and back muscles

Stretches your chest and shoulders

Standing Leg: strengthens the front of your hips (hip flexors), your thighs (while also stretching the back of your thighs/hamstrings), shins, and ankles

Lifted Leg: Strengthens your gluteals and back of thigh (hamstrings). Stretches the front of your hip (hip flexors), front on your thigh (quadriceps), and ankle

Contraindications

Hip pain, hip arthritis, or a hip replacement

Hamstring or groin tear or injury

Acute back pain or injuries, including surgeries, arthritis, disc bulging or herniation, or SI (sacroiliac) pain

Hernia

Shoulder injuries

Photo poses in different angles

Tips For Beginners

  • Try using a Strap to hook around your lifted foot. You can either hold it with your right hand or lengthen the strap to the point where you could get both hands holding the strap. This position with your arms and hands will prep you for the advanced and full version of the pose.
  • Be cautious to prevent falls if you have poor balance. Consider pose variations using a chair or the wall for stability.

Tips For Advanced Practitioners

  • To advance the pose, you could try bringing both hands overhead and grabbing hold of the lifted foot with your hands. When grabbing hold with both hands, be mindful to keep both arms knitted into the body, with elbows close to the ears. Be mindful to keep your shoulders drawn down your back.

Frequently Asked Questions

Variations

  • King Dancer Pose B Aerial
  • Dancer Pose in front of a chair or wall
  • Dancer on a chair
  • King Dancer Pose B Foot Aerial
  • Dancer Pose with a wheel
  • King Dancer Pose B
  • Manta Ray Pose Aerial
  • Dancer Pose II
  • Standing Bow Pose
  • Dancer Pose with a strap
  • Mermaid Dancer
  • Scorpion Dancer
  • Standing Full Split

Top Follow-Up Poses

  • Mountain Pose
  • Tree Pose
  • Dancer Pose II
Best Yoga Straps Reviewed and Rated
The Best Yoga Straps: Your Ultimate Buying Guide
/

You do not compulsorily need anything more than your body, breath, and a room spacious...

Best Yoga Chairs: Pros, Cons, And Usuful Tips
Best Yoga Chairs: Pros, Cons, And Useful Tips
/

If you ask a beginner yogi to make a list of common yoga equipment, nine...

best yoga mat for you
The Best Yoga Mats For Your Practice
/

The art of yoga is a special one and those who enjoy practicing on their...

best yoga wheel review
Best Yoga Wheels For Improving Flexibility And Strength
/

A yoga wheel is the newest prop trend. It has a circular shape, hollow and...


Iana Varshavska
Iana Varshavska
Website administrator

A digital marketer in love with yoga and everything that goes along with it. In 2021, her huge passion for yoga led her to yoga teacher trainings. After successfully completing her studies, Iana received her Yoga Alliance U.S. certification, left the corporate IT world and devoted herself to the development of Yanva. To be able to create the best online yoga space for yoga enthusiasts like her, Iana is constantly learning and improving her skills in various aspects of yoga philosophy, anatomy and biomechanics. Since 2021, she has continued to attend various types of teacher training, including yoga therapy, gives online and offline classes, and conducts local workshops for people who want to learn more about yoga. At the moment, Iana continues to work on her personal practice, improving her hand balancing skills, as well as developing her own training programs.