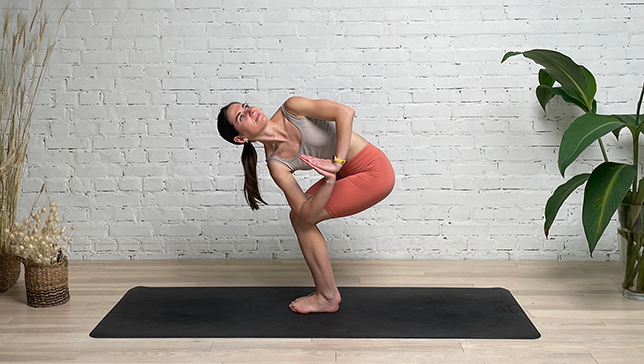
Revolved Chair Pose - Parivrtta Utkatasana

Contents
Revolved Chair Pose, Twisted Chair Pose or Parivrtta Utkatasana in Sanskrit ( parivrtta means “revolved”, utkata means “fierce” and asana means “pose”) is considered a base pose as Revolved Chair Pose variations can be derived from this pose. A great way to strengthen and lengthen the leg muscles, this challenging posture also lengthens and improves mobility in the spine. Practicing Parivrtta Utkatasana will give a feeling of groundedness in the lower half of the body and open spaciousness in the upper body.
In order to deepen the posture, you must find strength in the legs and lightness in the spine and upper body. While it’s easy to only focus on deepening the twist, the best results come from first setting up your foundation. This philosophy of building a strong foundation through rooting and grounding is helpful in life. While your goals and aspirations, even your daily to-dos, can constantly demand your attention, get strong through your roots before you try to spread your wings.
Pose Detail
- By Type: Balancing Yoga Poses, Chest Opening Yoga Poses, Flexibility Yoga Poses, Shoulder Opening Yoga Poses, Strengthening Yoga Poses
- Difficulty: Beginners, Intermediate
- Body Position: Standing Yoga Poses, Twist Yoga Poses
- By Benefit: Yoga Poses For Digestion, Yoga Poses For Stress Relief, Yoga Poses For Weight Loss
Step-by-Step Instructions


Benefits and Contraindications
Stretches and opens the chest, shoulders and upper back
Strengthens the glutes, thighs, ankles, calves and lower back
Stimulates the heart and abdominal organs
Increases balance and focus
Improves joint range of motion
Neck injuries
Back injuries
Low blood pressure or dizziness
Pregnancy
Photo poses in different angles


Modifications, Props and Tips
- Don’t let your knees move in front of your toes, to protect your knee joints. Keep pressing your shin bones back and weighting your heels, to keep your knees pressure free.
- Don’t let one knee slide in front of the other. Learn to stabilize your pelvis and lower back with the symmetry, allowing for a deeper and pain-free twist.
- Use a folded blanket or rolled yoga mat beneath your heels to keep your feet firmly planted when practicing this posture.
- Place a block between your inner thighs. Squeeze the block as you twist to help keep your knees aligned.
Frequently Asked Questions
Yes, beginners can practice the Revolved Chair Pose with proper guidance and modifications. It’s important to listen to your body and not force the twist beyond your comfortable range of motion. Start with the basic Chair Pose (Utkatasana) to build strength and stability before attempting the revolved variation. As you progress, you can gradually deepen the twist and explore different variations of the pose.
It is recommended to hold the Revolved Chair Pose for 30 seconds to 1 minute on each side, gradually increasing the duration as your practice progresses.
Yes, the twisting motion of the Revolved Chair Pose stimulates the digestive system, aiding in digestion and detoxification.
If you have knee or hip issues, it’s important to approach the pose with caution. Modify the pose or seek guidance from a qualified yoga teacher or healthcare professional to ensure safety.
Common mistakes include rounding the back, collapsing the chest, or forcing the twist beyond your comfortable range. Focus on maintaining a straight spine and engaging the core.
Yes, individuals with limited flexibility can still practice the Revolved Chair Pose. Start with gentle twists and gradually work on increasing the range of motion as your flexibility improves.
Variations
- Revolved Chair Pose One Hand On Knee
- Chair Pose
- Chair Pose Aerial
Top Preparatory Poses
- Swaying Palm Tree Pose
- Standing Cat Cow Pose
- Chair Pose